Adrian, Brin and Jan
Due Feb. 21, 2011
Locked vs. Free Seismogram Paper in a Custom Seismograph
I. GUIDING QUESTION: When creating a custom seismograph, is it better to have the paper that the seismogram will be recorded onto locked into place while the ground below it moves, or is it better to have the paper loose and being dragged forward slowly?
II.HYPOTHESIS:
Adrian’s Hypothesis: I think that it is better to have the paper locked into place on a moving platform, because if the paper was lose, it might resist the moving platform’s movement because of inertia and inaccurately record the moving platform’s movement.
Brin’s hypothesis: I believe that it is more sophisticated if the paper was to be “Locked” on the platform, because if it was not it could stop the platform from moving, this is because of inertia, if the paper is locked the results will be much more accurate.
Jan’s hypothesis: I think that if the paper remains stationary, the results should be more accurate when it comes to recording the strength of the “earthquake”. On the other hand, with the paper moving, we can do a much better job at recording how the “earthquakes” gradually strengthens or weakens.
III. EXPLORATIONS:
Materials
- Marker.
- Many blank papers.
- String.
- Around 5 one Meter Sticks.
- Masking tape.
- Rubber bands.
- About 15 Large metal washers that will be used as weights.
- Scotch tape.
- A large table
- A cabinet or piece of furniture adjacent to the large table that isn’t connected to the large table and doesn’t move easily.
Procedure
- Sturdily tape or rubber band together 4 one meter sticks.
- Stand this contraption up vertically next to your cabinet/piece of furniture, and tape the meter stick contraption tightly onto the cabinet/piece of furniture sing masking tape, in multiple locations for extra strength.
- On the top of the meter stick, lie down a meter stick face down, so that about 15-20 cm of the meter stick is on one side, and 80-85 cm is on the other. The short side should be on the far side of the table, and the long side should be at least 30 cm over the table. Secure the single meter stick on with lots of masking tape. Now you should have built something that looks like a crane attached to a cabinet/piece of furniture.
- Make two bundles of about 7 or more stacked metal washers, and tape them together using masking tape. Place them on the small side (the 15-20 cm side) of the top of the “crane”, and tape the bundles onto the surface of the meter stick so they are stable. Your “crane” now has weights that will help it remain stable and counteract the weight that will be placed on the long end of the crane.
- Cut a piece of string (the string’s needed length depends on how high the top of the long end of the crane is over the table, but I recommend around 75 cm to give yourself enough room if you need it), and fold it in half.
- Using that folded string, tape the end that is folded onto the tip of the long side of the “crane”. Trim the ends of the other side so they are both of equal length, and are a few centimeters above the surface of the table.
- Tape a marker top-down to the suspended strings, so that the tip of the marker is barely touching the tip of the table.
- On the middle of the marker, tape one metal washer (the same as you used before) to use as a weight that stabilizes the marker.
- Tape down two pieces of paper horizontally next to to each other under the marker, so the marker has one long paper path to travel on. This is for test where the paper is fixed into place.
- For the other test, tape together two pieces of paper, but do not tape them down to the table.
- For the non-fixed-paper test, tape together 2 sheets of paper and as the table is being shaken back and forth but not down, have someone slowly slide the paper down.
- For the fixed-paper test, shake the table as strong or lightly as you like, with variation for 30 seconds while slowly moving the table to the side at a consistent rate. (Note if you can’t fit 30 seconds of earthquaking on two papers, just add more papers.)
IV. RECORD & ANALYZE
Data Tables: Pictures of our seismograms:

Analysis of Data:
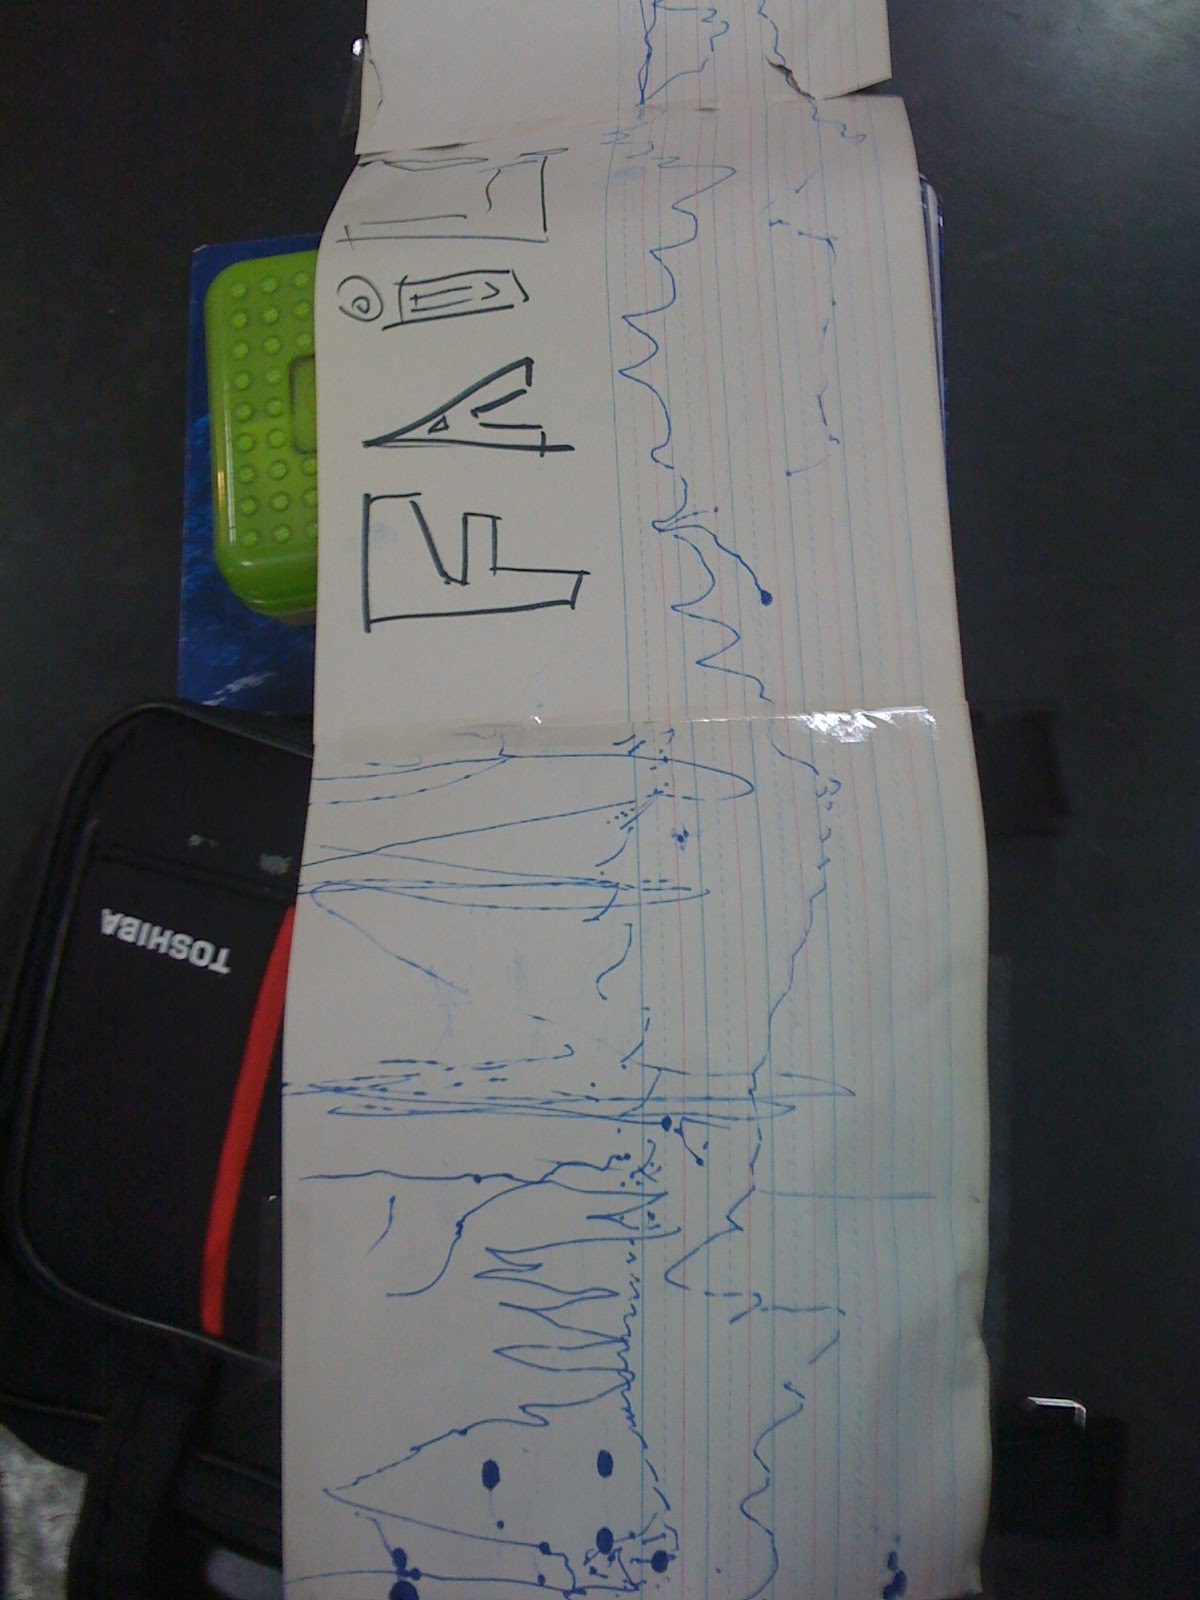
Adrian’s analysis: The first picture shows the seismogram we produced with the non-fixed paper method. The method failed to produced accurate and reliable results. We deemed this method a failure, as indicated by the text in the picture. The second picture showed our second method, where to paper was fixed into place. Although this method wasn’t all that reliable either, it was much more reliable than the first method and the results were inherently better. You can see we tested a “strong earthquake” by shaking the table very hard on the top (the left side) and we tested a “lighter earthquake” by shaking the table less hard on the bottom (the right side). In other words, you can see accurately when we were tested either hard or weaker earthquakes in the second picture, but you can’t really tell when there was a hard or weak earthquake in the first picture. That’s why we deemed our second method a “WIN!”. I believe that the second method was better than the first because when the paper was loose and not fixed into place, it didn’t move when the table did, and it also sometimes drifted to the side and had other off quirks that interfered with the reliability of the data. However, when the paper was taped to the table, it moved with the table, and never drifted off the the side, which led to better and more reliable data.
Brin’s analysis:
In the first picture we (me and Adrian) had a paper that was not taped or fixed onto the table, this method did not work because the paper kept moving and so did the table, so our result was not very accurate. The second picture shows the results to when me and Adrain taped the paper onto the table, this was our second method, it was not too reliable but it gave us the basic earthquake strength and it was much more reliable than our first method. This can be proved because, in the picture were it sais “FAIL”, we shuck the table with a lot of force, the data remained basically the same when we shuck the table with less force this told us that there was something wrong with our method. Then we used our second method (the paper that states “WIN”) on it. It was much more effective because as you can see when we taped the paper to the table the results for the larger force were larger then the results of the weaker force. Even of the paper was taped to the table it was still moving with the table this is what led to a “WIN” and more reliable data.
Jan’s analysis: As my group members have stated above, the moving-paper method (shown on the first picture) turned out rather inaccurate as the movement of the paper wasn’t straight enough for us to get reliable results. That is the reason why my friends have written “FAIL” on the paper. Then they chose to have the paper fixed to the table so that it moves accurately with the table. Although my classmates have written “WIN” on the paper, I dare to question this method. That is so because although the paper moves along with the table, it still doesn’t necessarily move straight. As you can observe yourself in the video attached below, the table wasn’t fixed to a certain way and when it was moved, the recordings of the waves of the “earthquakes” seem rather unreliable.
V. CONCEPT ACQUISITIONS (CONCLUSION):
Adrian’s Conclusion: My guiding question was: “When creating a custom seismograph, is it better to have the paper that the seismogram will be recorded onto locked into place while the ground below it moves, or is it better to have the paper loose and being dragged forward slowly?”. In our experiments, I found that it was better to have the paper locked into place while the ground below it moves. It is that way because if the paper isn’t locked into place, it doesn’t move while the ground below it moves (it doesn’t move because of inertia), and the paper sometimes drifts to the sides, both of which make the seismograms from the non-fixed-paper seismograph less reliable. That is pretty much what my hypothesis stated, so my hypothesis was correct.
Brin’s conclusion:
My guiding question was: “When creating a custom seismograph, is it better to have the paper that the seismogram will be recorded onto locked into place while the ground below it moves, or is it better to have the paper loose and being dragged forward slowly?” When I looked back at our experiments I found out that is was much more effective when the paper is stationary or locked onto the place that is moving due to the movement of the ground. This is because paper is locked in place, the paper doesn't move due to Inertia. And when we had the paper “free” it sometimes slipped away form the paper which made our data less reliable, and we also almost ruined the desks. This is what I stated in my hypothesis so i believe it was correct.
Jan’s conclusion: Our guiding question asked: “When creating a custom seismograph, is it better to have the paper that the seismogram will be recorded onto locked into place while the ground below it moves, or is it better to have the paper loose and being dragged forward slowly?” In my hypothesis I stated that I believe that the moving paper was going to be better at recording how the earthquake progresses while the non-moving-paper method would be more accurate. I believe that in our lab, we have proven that the non-moving-paper method was more accurate although I am not convinced that it was sufficient at recording how the “earthquakes” progressed.
VI. CONCEPT APPLICATION (FURTHER INQUIRY):
Adrian’s Further Inquiry: In this lab, my data from the custom seismographs wasn’t very reliably valid by usual scientific standards, but I found that it is incredibly difficult to make your own seismograph that reliably produces valid data. By our own custom seismograph reliability standards, our second test was acceptably reliably valid, but our first simply was not. The biggest reason that the data from the first test wasn’t reliably valid was the same thing that I was writing the whole lab about: the first test’s paper didn’t move with the paper and often drifted to the side.
Brin’s further inquiry: In our lab our data wasn't to reliable but through working with my partners we figured out it was difficult to create a seismograph that was reliable and correct. But on the other hand our second seismograph was valid but not as much as it could be, this is because the seismograph was only a simple model. One of our shockers was our first test the data was not reliable because of the fact that the paper was “free” this made our seismograph invalid, I believe next time we would make this project we could have more reliable and valid data.
Jan’s further inquiry: As I have mentioned above, none of our tests seemed very reliable. This is due to our lack of equipment for creating a more sophisticated tool. I wonder if our conclusion would have changed if our tests were more accurate and we could truly see the advantages and disadvantages of each method. An important factor was probably also that all of the movement, both table and paper, was made using human labour which is rather unbalanced and therefore not very accurate.
Further Documentation:


The observations and images of the seismograph were very effective in showing the effectiveness of the seismograph to record seismic activity. Unfortunately, you missed class time with your group and so you didn't see the modifications they needed to make in order for it to record properly. The paper needed to be attached to the ground (table) in order for the suspended system to work. In the end, your conclusion was partial to your own thoughts and not so much the data collected.
ReplyDeletePlease change the font color because it is very difficult to see it when it is black on black.